Midnight Moon Phases

By Sarah Diregger

Imagine you’re lying on your back, looking up at the sparkling stars scattered across the seemingly endless sky. The full moon drenches the nightly landscape into shades of grey. You’re enjoying the moment but a scientific thought snakes its way into your consciousness and asks, “Why do we never see a full moon during the daytime?” To help answer this question, I conducted an experiment. You’ll need:

  • A flashlight
  • 2 balls (preferably in two different sizes)
  • An even surface

Now, you must set the two balls on the surface at a distance of approximately 10 – 20 cm. Now hold the flashlight, which represents the sun, about a meter from the two balls. I suggest using different-sized balls. The smaller one is the Moon and the larger one Earth.
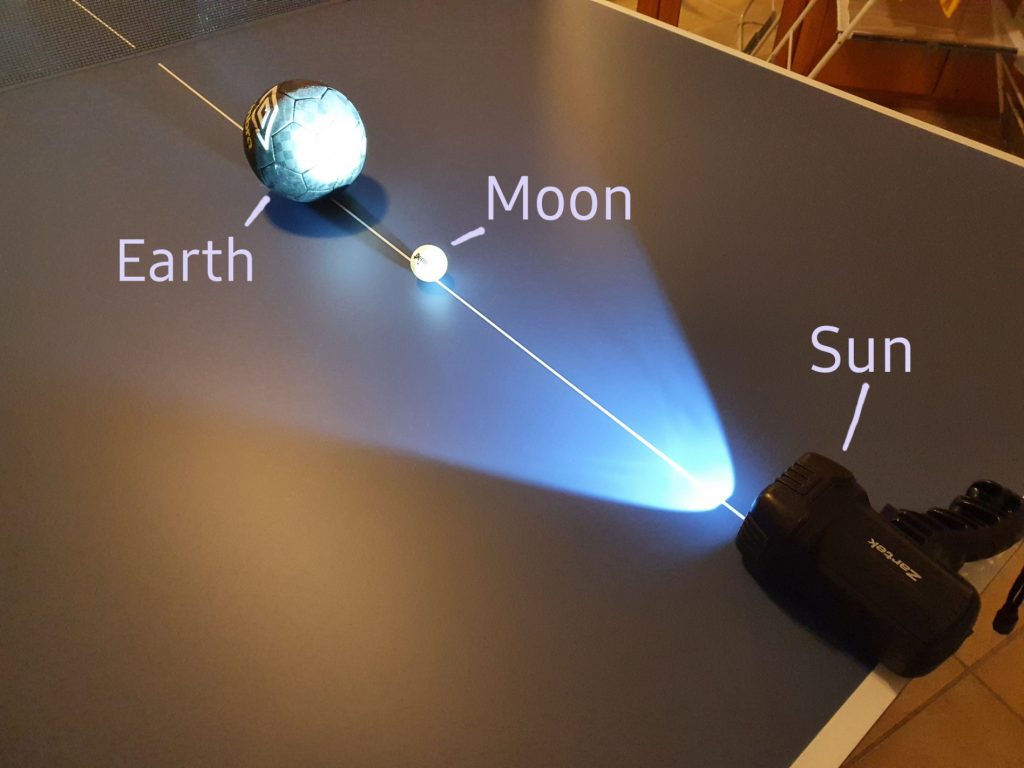
We all know that the Earth rotates around the Sun, and the Moon orbits the Earth. It’s also important to know that the Earth rotates around itself. One rotation of the Earth around itself takes 24 hours, and one rotation of the Moon around Earth takes 27,3 days.

Moving our “Moon” around the “Earth” in the experiment, we can see that depending on the position of the Moon, it’s seen from a different time of day. When the Moon is between Earth and Sun, it’s called a new moon. That means, from the point of view of Earth, you can’t see it at all.
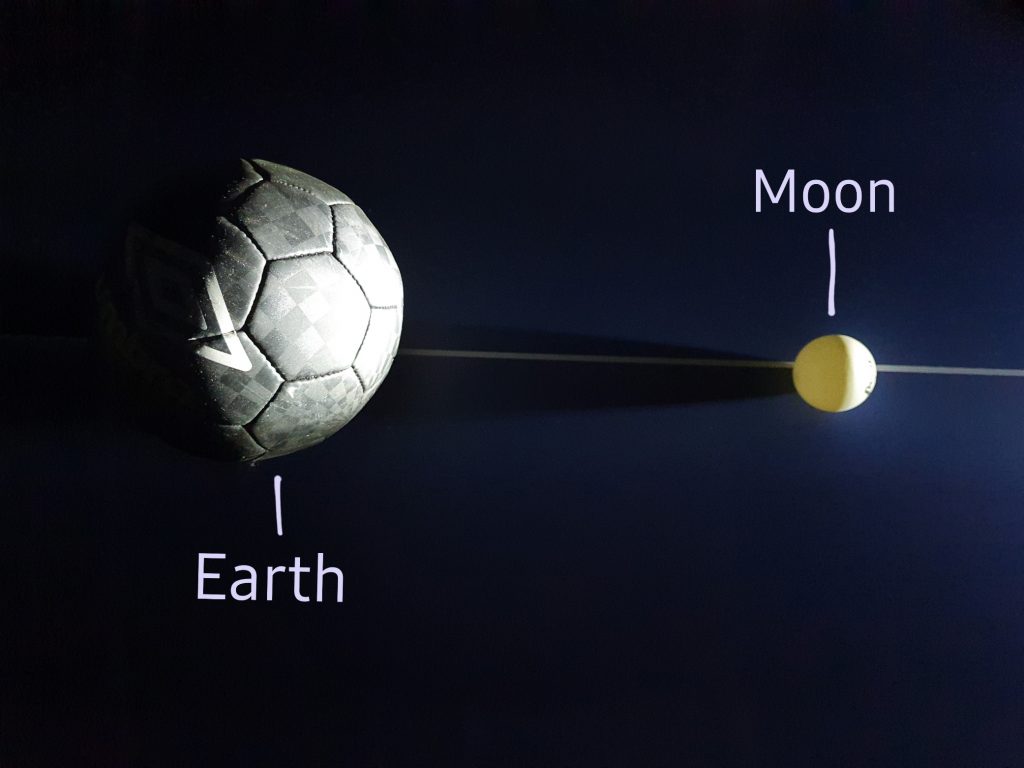
To imitate the rotation of the Moon, move it about 45° counterclockwise. You will see that from the vantage point of the Earth, a little light appears on the right side of the Moon. This waxing crescent, as we call it, can be seen at its highest position in the afternoon.

When you continue this process and move the Moon 45° counterclockwise each time, the following results can be observed:
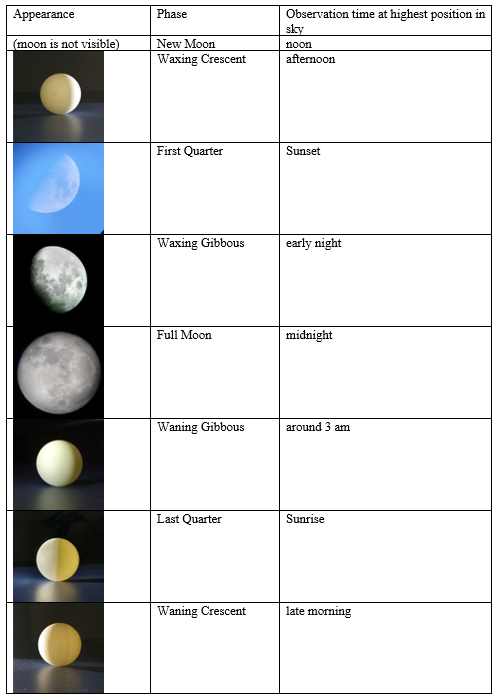
Some of the pictures above depict the real Moon and the others show our “Moon” model in the experiment.

Fun Fact:
From Earth, we always see the same side of the Moon. This is called “Tidal Locking”. It occurs when the rotation around the own axis and the rotation around another body take the same time.

Due to the position of the Moon and the Sun, we can only see a certain Moon phase in the center of the sky at a specific time of day. It’s very important to note the position of the Sun in all of this because it indicates which part of the Moon is illuminated and when we can observe this amount of illumination. That’s why we never see a full moon during the day.

Sources:
Byrd, Deborah: Moon Phases. Top 4 keys to understanding moon phases. https://earthsky.org/moon-phases/understandingmoonphases/#:~:text=As%20seen%20from%20the%20north,Not%20to%20scale. (last access: 21.03.2022)
Anon.: Lunar Phases and Eclipses. Earth’s Moon. https://solarsystem.nasa.gov/moons/earths-moon/lunar-phases-and-eclipses/#:~:text=These%20eight%20phases%20are%2C%20in,third%20quarter%20and%20waning%20crescent. (last access: 21.03.2022)
Anon.: Moon Phases. Moon in Motion. https://moon.nasa.gov/moon-in-motion/moon-phases/
Gunn, Alastair: Space. What is tidal locking?. https://www.sciencefocus.com/space/what-is-tidal-locking/ (last access: 21.03.2022)

fotocredit: © by Sarah Diregger

Telefonieren ohne Strom

von Eva-Maria, Jana, Paul, Pia

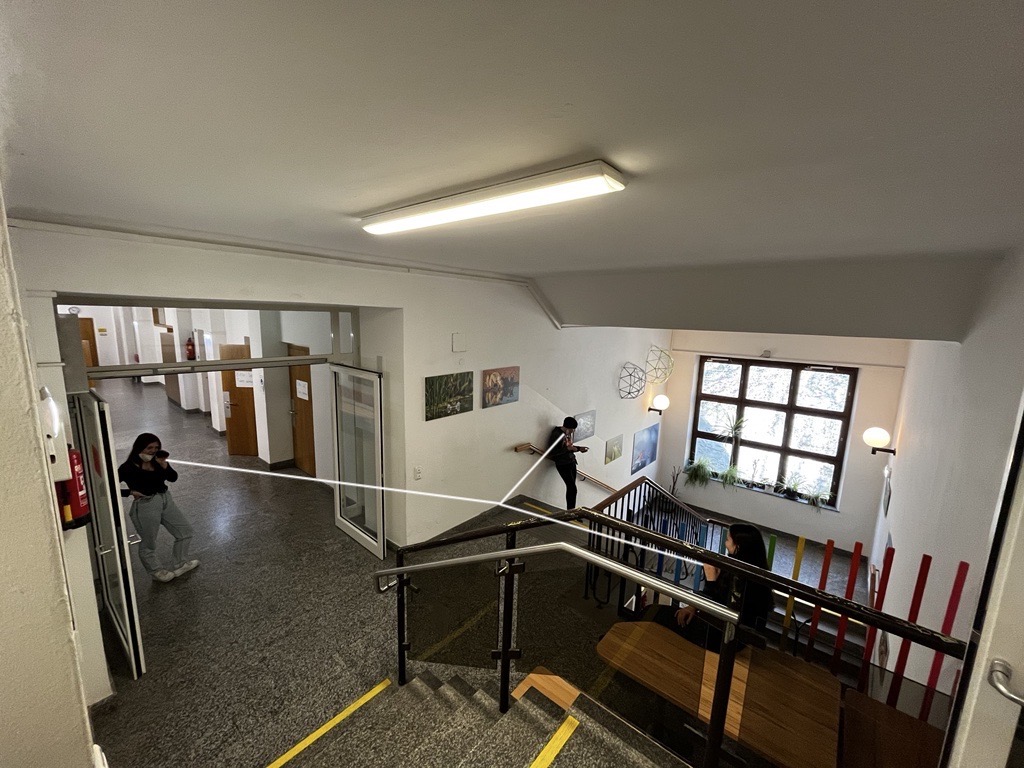
Heute zeigen wir dir, wie du ganz ohne Strom und mit Sachen, die du ziemlich sicher zu Hause hast, ein Telefon basteln kannst.  

Dafür brauchst du: 

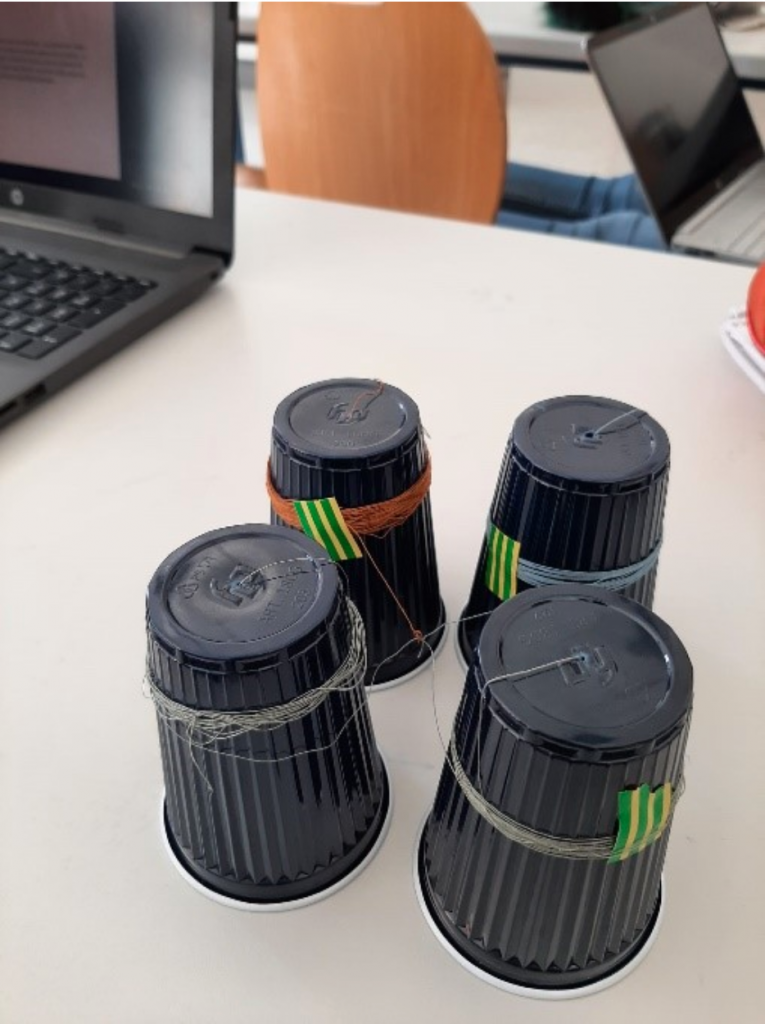
  • Plastikbecher (4) 
  • Faden (3,5 Meter lang) 
  • Nadel 
  • kleines Holzstück 

Als Erstes musst du bei jedem Becher ein kleines Loch durchstechen, wo du dann den Faden durchführst. Danach verknotest du den Faden im Becher mit dem kleinen Holzstückchen, sodass der Faden nicht mehr herausrutschen kann. Als letzten Schritt musst du 2 Becher mit dem gleichen Faden verbinden und wenn du mehr als 2 Becher verwenden willst, musst du für jeden zusätzlichen Becher einen weiteren Faden in der Mitte anknoten. 

Physikalische Erklärung für Dummies:  

Die Stimme besteht aus Wellen, die beim Hineinsprechen in den Becher zentriert und an den Faden weitergegeben werden. Diese Vibrationen schwingen über den Faden dann zu den anderen Bechern, wo sie wieder freigesetzt werden.

Fotocredit: © by the ScienceBlog Team

Physics Olympics 2021/2022

Despite the ongoing Corona virus pandemic, a Physics Olympics course leaded by Mr. Haberbauer could take place in school year 2021/2022 in our school.

After a few days of searching for new, young and enthusiastic participants, we could finally start at the beginning of October 2021 with eleven curious scientists to meet up every second Friday afternoon from a quarter to two to half past four in the Physics room. During the voluntary homeschooling in December, the students were connected via Microsoft Teams video meetings in order to collaborate in remote as effectively as possible.

On the one hand, the participants dealt with several more or less difficult exercises out of the different physical disciplines. In addition to the theory, they conducted and did experiments, but also had a look at the processes behind that explain different usual and unusual phenomena according to our slogan „Everything happens for a reason, and that reason is usually Physics.“. 

In order not to overtax our new and rather unexperienced physicists from fifth grade, a wide range of tasks with different levels of difficulties were offered to choose between. While the younger participants tried to solve former course competitions, their elder colleagues had a look at the regional and countrywide contests.

As every year, the Physics Olympics course competition on Friday before the half-term holidays (February 18th, 2022) was the conclusion of an amazing and highly interesting course. In it, the competitors had to solve tasks out of the categories Mechanics, Electricity and Optics, some even had the opportunity to find out the spring constant of a rubber ring by measuring the weight of the metal cylinders and the diameter of the expanded rubber ring. After Mr. Haberbauer had evaluated the exams, he could happily announce that Michael Himmelbauer (7a, first place), Jonas Untersperger (7a, second place) and Elias Leitinger (7b, third place) had qualified for the regional competition of Upper Austria. The other candidates Sarah Diregger (6a), Florian Nowitzki (7a), Oliver Kovacs (7b), Evelyn Herrmann (5b) and Moritz Kolb (5b) could achieve respectable results as well.

After the well-deserved half-term holidays with more or less private preparation at home, the three students (mentioned above) took part in the Upper Austrian Physics Olympics regional competition on Tuesday, March 1st, 2022. Due to the Corona pandemic, it had to take place in the course schools again (as the year before) as a replacement for the traditional event in Linz. The tasks and materials for the experiment were sent to the schools in advance. Within a worktime of four hours, the candidates had to solve challenging exercises out of the disciplines Mechanics (opening a door with the help of a rope), Electricity (generating voltage by using solar panels) and Optics (lenses, bar grid), the experiment was out of the category Electricity. By charging and discharging, the capacity of a capacitor had to be calculated. Furthermore, a voltage was produced in a rather tiny solar panel with the help of a little LED, its effects on the flow had to be investigated.

After a stressful afternoon of correcting the calculations and submitting the results to the regional coordinator in Linz, we happily received a message that Michael Himmelbauer (7a) won a first prize, that is why he qualified for the countrywide competition 1 on March 14th, 2022, Elias Leitinger (7b) reached a third prize, Jonas Untersperger (7a) could achieve a respectable ranking as well.

In representation for all participants, I would like to thank Mr. Haberbauer for his patience and efforts throughout an exhausting, but also fascinating year of Physics Olympics!

written by Michael Himmelbauer

Die magische Kugel

von Eva-Maria, Jana und Pia

Ihr habt doch bestimmt schon einmal so eine „Blitzkugel“ wie auf dem Bild gesehen und euch gefragt, wie diese funktioniert.  Der richtige Name der ominösen Kugel lautet übrigens Plasmakugel. Wie sie aufgebaut ist und funktioniert, erklären wir euch jetzt. 

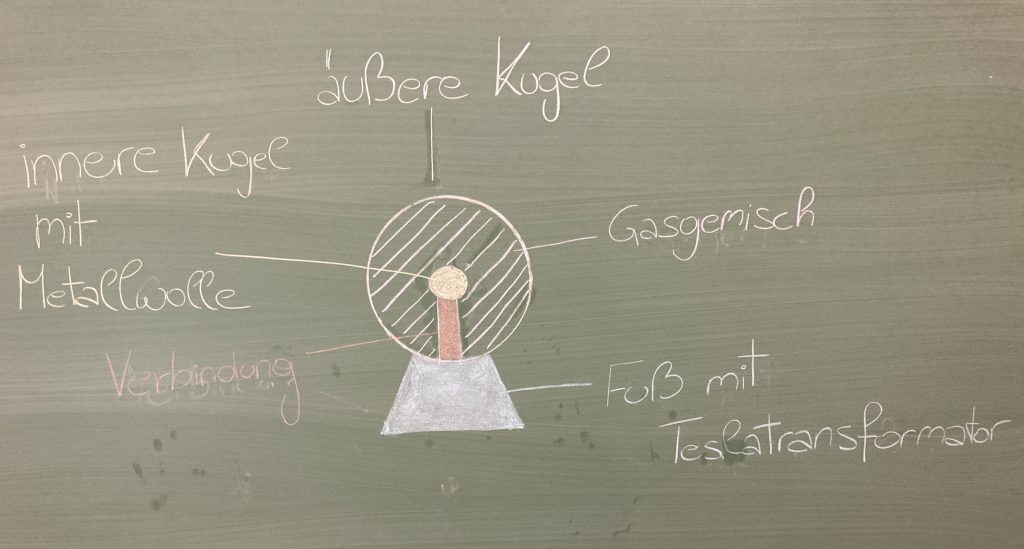
Zur besseren Veranschaulichung haben wir euch eine Skizze gezeichnet:


Der Aufbau der Plasmakugel ist relativ simpel gehalten. Der wohl größte Bestandteil ist die äußere Kugel (weiß), diese ist mit einem Gasgemisch (lila) befüllt, das meist Edelgas ist. Weiter geht es mit der inneren Kugel (grün), die mit Metallwolle gefüllt ist. Die innere Kugel ist dann mit dem Fuß (blau) verbunden, in dem sich der wohl wichtigste Bestandteil befindet, der Teslatransformator. 

Auch wenn der Aufbau so simpel ist, ist die physikalische Erklärung dahinter etwas komplizierter. Also gut aufpassen! 😉 
Als Herzstück des Aufbaus dient ein Tesla-Transformator. Dieser wurde von keinem anderen als Nikola Tesla (1892) erfunden. Der Transformator dient vor allem zur Erzeugung von Hochspannung. Die Leistung von Tesla-Transformatoren bewegt sich trotz hoher Momentanleistung im Bereich von wenigen Watt. Durch die geringe Leistung ist es eine relativ gefahrlose Hochspannungsquelle. Der Transformator, der sich im Fuß dieser Lampe befindet, und eine integrierte Oszillatorschaltung erzeugen einen hohen Wechselstrom von ca. 20 kHz und einigen Kilovolt Spannung. 

In der Mitte der äußeren Kugel befindet sich eine Elektrode. Die Gegenelektrode ist die Umgebung. Durch den Transformator entsteht zwischen Elektrode und Gegenelektrode eine Potentialdifferenz. Durch das Einschalten werden die im Gas enthaltenen Elektronen und Ionen stark ionisiert und so die blitzähnlichen “Fäden” erzeugt, die man sehen kann. Dank der Elektrode sind die Blitze gleichmäßig aufgeteilt. Legt man seine Hand auf die Kugel, so wird der Ionenstrom in eine Richtung verstärkt und so mehr Blitze in dieser Region erzeugt. Dies kommt dadurch, da am Berührpunkt die Potentialdifferenz dann noch etwas höher ist als am Rest der Kugel.

Quellen:

Universum Managementges. mbH: #schongewusst: So funktioniert die Plasmakugel. #schongewusst: So funktioniert die Plasmakugel – Universum Bremen (universum-bremen.de) [Zugriff: 28.02.2022]

Aydin, Özgür: Die Wissenschaft der Plasmakugel. So funktioniert die Plasmakugel. Funktionsweise – Die Wissenschaft der Plasmakugel (plasma-kugel.de) [Zugriff: 28.02.2022]

Köhnseemann, Alf: Die Plasmakugel. Die Plasmakugel » Formbar » SciLogs – Wissenschaftsblogs (spektrum.de) [Zugriff: 28.02.2022]

Dresel, Christian: Plasmakugel. www.plasmakugel.net [Zugriff: 28.02.2022]

Fotocredit: © by the ScienceBlog Team